15 Soccer Injury Prevention Exercises for Speed and Stability
.webp)
Picture this: you're minutes into a match when a sharp pain shoots through your hamstring, forcing you to limp off the field while your team plays on. Muscle strains, ankle sprains, and knee injuries sideline thousands of soccer players every season, often because their training overlooked the specific movements that protect joints and build resilience. This article breaks down soccer injury prevention exercises that target the exact demands of the game, from quick direction changes to explosive sprints, so you can perform soccer-specific exercises that prevent injuries, enhance speed, and improve stability without sacrificing time on the pitch.
That's where a mobility app like Pliability becomes your training partner. Instead of guessing which stretches or strengthening routines actually matter for soccer, you get guided routines designed around the movements your body needs most: hip flexibility for those wide stances, ankle stability for sudden pivots, and core strength that keeps you balanced through contact. The exercises adapt to your schedule and skill level, making it easier to build consistency and see real results in your on-game performance.
Summary
- Hamstring strains account for up to 50% of all muscle injuries in soccer, yet most training programs overlook the eccentric strength that helps prevent them. These injuries occur during the terminal swing phase of high-speed running, when the hamstring must lengthen under load to decelerate the lower leg. Nordic curls replicate that exact demand, building the strength reserve needed when you accelerate past a defender.
- Female soccer players face significantly higher ACL injury risk because they demonstrate less knee flexion during deceleration, cutting, and landing tasks compared to male players. They typically stay in the 0-to-30-degree knee flexion range where ligament strain peaks, and 80% of ACL injuries are non-contact.
- About one-third of athletes who suffer a hamstring strain will injure it again within a year, and the second injury is almost always worse than the first. After a lateral ankle sprain, balance impairments and compensatory movement patterns can persist for up to 6 months in both the injured and uninjured ankles.
- Proper warm-up exercises can reduce injury risk by 30%, but that still leaves 70% of variables you can't fully control. Elite players now face schedules packed with 72 games in a season, and recovery time between games has shortened in recent years. That compression means small imbalances don't have time to resolve, and a tight calf can lead to chronic ankle instability.
- Most players abandon prevention routines within six weeks because the work feels repetitive and the benefits feel abstract. You can't measure improvement in injuries that didn't happen, which creates a gap between effort and visible reward that kills motivation. Between 2000 and 2012, over 2.4 million soccer-related injuries led to emergency room visits in the United States alone.
Pliability's mobility app helps soccer players build consistent injury-prevention habits by structuring exercises into guided routines that target hip flexibility, ankle stability, hamstring strength, and core activation, with progress tracking that provides the feedback loop needed when motivation wanes.
Why Do Soccer Players Keep Getting Injured?
Soccer players continue to get injured because most training programs prioritize skills and cardiovascular fitness while overlooking the movement quality, joint stability, and muscle balance that protect the body under load.
You can have elite endurance and technical ability, but if your hamstrings can't control the force your quads generate during a kick, or your ankles lack the stability to handle a sudden cut, those physical gaps will find you. The issue isn't that players aren't working hard enough. It's that they're working on the wrong things.
The Belief That Injuries are "Part of the Game"
We've normalized preventable damage. Between 2000 and 2012, more than 2.4 million soccer-related injuries resulted in emergency room visits in the United States alone. That's not bad luck. That's a systemic failure to address how bodies break down under repetitive stress.
Most Soccer Injuries are Preventable
The phrase "unfortunately, injuries are a part of sports" gets repeated so often that it sounds like wisdom, but it's actually resignation dressed up as realism.
Yes, contact happens. Yes, collisions are unavoidable. Most soccer injuries aren't caused by an opponent's tackle. They happen because a player's body couldn't handle a movement it should have been prepared for.
Common Patterns in Soccer Injuries
Hamstring strains account for up to 50% of all muscle injuries in soccer. Ankle sprains account for another 15-20%. Groin strains, quad tears, and ACL ruptures round out the list. These aren't random events.
They follow predictable patterns tied to specific weaknesses, such as insufficient eccentric hamstring strength, poor hip adductor-to-abductor ratios, limited ankle mobility, and movement mechanics that put knees in vulnerable positions during cutting and landing.
How the Body Signals Vulnerabilities
The body telegraphs its weak points long before an injury happens. Tight calves that restrict ankle dorsiflexion. A quad that overpowers the hamstring during a shooting motion. A hip that can't stabilize during a pivot. These imbalances don't present as pain until the tissue fails.
What Players Actually Train Versus What Protects Them
Most soccer training focuses on the visible, including speed, endurance, ball control, and tactical positioning. Those matters. But they don't prepare joints to absorb force or muscles to decelerate limbs traveling at high velocity.
A player can run for 90 minutes and still lack the eccentric hamstring strength needed to control knee extension during a kick. They can execute perfect through balls but have no proprioceptive awareness in their ankles after landing from a header. Conditioning builds the engine. It doesn't reinforce the chassis.
How Movement Failures Cause Injuries
The gap shows up in how injuries unfold. Hamstring strains most often occur during the terminal swing phase of high-speed running, when the hamstring must eccentrically contract to decelerate the lower leg as the quadriceps pulls it forward. If the hamstring can't match that force, the muscle overstretches and tears.
Groin strains occur because hip adductors are weaker than abductors, creating a muscle imbalance that leaves the inner thigh vulnerable during wide stances and lateral movements. ACL injuries, 80% of which are non-contact, occur when players land or cut with minimal knee flexion, typically between zero and 30 degrees, a range where ligament strain peaks. These aren't conditioning failures. They're movement quality failures.
Female Players and Higher Injury Risk
Female soccer players face an even steeper risk. Research shows they exhibit significantly less knee flexion during deceleration, cutting, and landing than male players, often remaining in the high-risk 0-to-30-degree range. That's not a strength issue. It's a neuromuscular patterning issue.
Their bodies haven't learned to absorb force through deeper, safer joint angles. Standard fitness drills won't fix that. You need targeted work that retrains how the nervous system coordinates movement under fatigue and pressure.
The Compounding Cost of Small Weaknesses
Injuries don't stay isolated. According to ESPN, elite players now face schedules packed with 72 games per season, and Barça Innovation Hub reports that recovery time between games has shortened in recent years. That compression means small imbalances don't get time to resolve.
A tight calf can lead to chronic ankle instability. A minor hamstring pull that isn't fully rehabbed becomes a severe re-tear two weeks after return. About one-third of athletes who suffer a hamstring strain will injure it again within a year, and the second injury is almost always worse than the first.
Lasting Effects of Ankle and ACL Injuries
The pattern repeats with ankles. After a lateral sprain, balance impairments and compensatory movement patterns can persist for up to 6 months in both the injured and uninjured ankles. Players believe they've healed because the pain is gone, but proprioceptive deficits persist. They step wrong, roll the ankle again, and the cycle deepens.
With ACL injuries, roughly one in three athletes who return to soccer will either re-tear the same ligament or injure the opposite knee. The original injury changes how they move. They favor the repaired side, overload the other, and create new vulnerabilities.
Injury Impact on Training and Confidence
Elite players miss an average of two weeks per injury, but the functional burden stretches to six weeks. That's six weeks of lost training adaptations, six weeks of compensatory movement embedding itself into muscle memory, six weeks of teammates adjusting to your absence.
Over a long season, those gaps don't just stall development. They erode confidence. A player who's been hurt three times in eight months starts hesitating in 50-50 challenges. They pull back on cuts. They second-guess their body's ability to withstand pressure. That hesitation becomes a risk of injury.
Why Reactive Rehab Comes Too Late
The standard approach waits for damage. A player feels a twinge, ignores it, pushes through a game, and wakes up the next morning unable to walk. Only then does rehab begin. Physical therapy addresses injured tissue, strengthens surrounding muscles, and eventually clears the player to return, but it rarely addresses the underlying cause.
The muscle imbalance that led to the strain. The movement pattern that puts excessive load on the joint. The mobility restriction forced compensation elsewhere.
Rehab vs. True Injury Prevention
Rehab is damage control. It's necessary, but it's not a prevention measure. Prevention requires identifying and addressing vulnerabilities before tissue fails. That means assessing eccentric hamstring strength before a sprint tears the muscle. Testing ankle proprioception before a sprain can lead to chronic instability.
Checking hip adductor-to-abductor ratios before a groin strain sidelines a player for eight weeks. Most players never get that assessment. They train hard, play hard, and hope their bodies hold up. When they don't, everyone acts surprised.
The Myth That More Fitness Equals Fewer Injuries
The belief persists that if players just condition harder, run more, lift heavier, they'll become injury-proof. It sounds logical. Stronger muscles should protect joints. Better endurance should reduce fatigue-related breakdowns. But strength without balance creates new problems. A player with powerful quads but weak hamstrings doesn't reduce injury risk.
They increase it because the quad can now generate more force than the hamstring can control. A player with excellent cardiovascular fitness but limited ankle mobility is not safer when moving. They just move poorly for longer.
Targeting Weaknesses for Injury Prevention
Injury prevention isn't about adding more volume. It's about targeting the specific movement deficits and muscle imbalances that create vulnerability. Eccentric hamstring exercises teach the muscle to lengthen under load. Adductor strengthening that balances force production across the hip.
Ankle mobility drills that restore dorsiflexion range and improve landing mechanics. Core stability work that maintains pelvic alignment during high-speed direction changes. These interventions don't require more time in the gym. They require a smarter time.
Smarter, Time-Efficient Training for Players
For players juggling school, work, or packed training schedules, that distinction matters. You don't need another hour of conditioning. You need 15 minutes of targeted movement work that addresses your body's specific weak points.
A mobility app like Pliability structures guided routines around the movements soccer demands most, including hip flexibility for wide stances, ankle stability for sudden pivots, hamstring and adductor strengthening for force control, and core activation to maintain balance through contact. The exercises adapt to your schedule and current mobility level, making it easier to build consistency without adding overwhelming volume to an already full training load.
What Actually Prevents Injuries
Effective prevention programs share common elements. They include dynamic warm-ups that prepare tissues for explosive movement. Plyometric drills that teach safe landing mechanics. Eccentric strengthening for hamstrings, adductors, and quads.
Core stability exercises that maintain alignment under fatigue. Balance and proprioception work that sharpens joint position sense. The programs that work best get implemented during preseason and maintained throughout the year, not abandoned once games begin.
Specificity Over Generic Training
The key is specificity. Generic strength training helps, but it doesn't replicate the exact demands of a cutting motion or the precise force distribution during a one-legged landing.
Soccer-specific exercises that use a ball, mimic game situations, and challenge balance under realistic conditions produce better carryover. They train the nervous system to coordinate muscle activation in the patterns required by the sport. That's what reduces injury risk. Not more fitness. Better movement.
Related Reading
- Injury Prevention Strategies
- What is Injury Prevention
- Cold Therapy for Athletes
- Can Tennis Elbow Cause Shoulder Pain
- Basketball Injury Prevention
- How to Prevent Pickleball Injuries
- How To Stop Wrist Pain From Lifting Weights
- Most Common Tennis Injuries
- How to Prevent Knee Pain When Running
- How Can You Prevent Injury While Cycling
- Injury Prevention for Athletes
Top 15 Soccer Injury Prevention Exercises
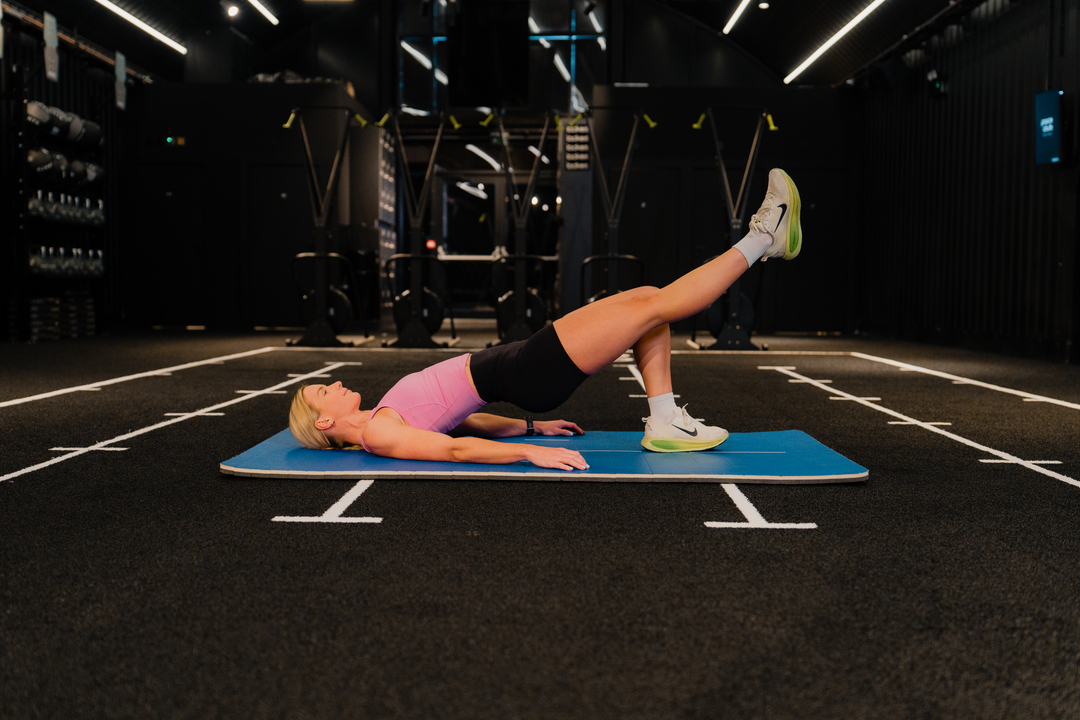
1. The Bench (Plank with Leg Lift)
Lie face down, forearms on the ground, elbows directly under your shoulders. Place your feet vertically on the ground. Lift your stomach, hips, and knees so your body forms a straight line from shoulders to heels, parallel to the ground. Tighten your abdominal muscles and buttocks.
Pull your shoulder blades toward the center of your back so they sit level with your back. Lift your right leg a few centimeters off the ground and hold for 15 seconds. Return to the starting position, relax, and repeat with your left leg. Perform one to two times per leg.
Core Stability During Explosive Movements
This exercise strengthens the deep core muscles that stabilize your spine and pelvis during explosive movements. When you sprint, cut, or jump, your core must resist rotation and maintain alignment while your limbs generate force in multiple directions.
Weak core stability allows your pelvis to tilt, shifting load to your lower back and hip flexors, creating compensation patterns that eventually break down. The single-leg lift adds an anti-rotation challenge, forcing your obliques and transverse abdominis to work harder to keep your hips level. That's the exact demand you face when planting on one leg to shoot or pivot.
Proper Form for Single-Leg Lifts
Keep your head, shoulders, back, and pelvis in a straight line. Don't tilt your head backward. Don't let your stomach drop or move your hips upward. When lifting your leg, don't let your pelvis tilt to the side. If you can't maintain alignment, shorten the hold time and build up gradually.
2. Sideways Bench (Side Plank with Top Leg Lift)
Lie on one side. Support your upper body with one arm, with your elbow directly under your shoulder and your forearm on the ground. Bend your bottom knee to 90 degrees. When viewed from above, your shoulders, elbow, hips, and both knees should form a straight line.
Lift your top leg and hips until your shoulder, hip, and top leg are in a straight line, parallel to the ground. Hold for 15 seconds. Return to the starting position, relax, and repeat on your other side. Perform twice on each side.
Lateral Core Strength for Pelvic Stability
This targets the lateral abdominal muscles (obliques and quadratus lumborum) that prevent lateral pelvic tilt during single-leg stance. Soccer demands constant weight shifts from one leg to the other.
If your lateral core can't stabilize your pelvis when you're on one foot, your hip drops, your knee caves inward, and you load your ACL in a vulnerable position. The side plank helps your body resist collapse. The top leg lift increases the challenge by adding a lever arm that tries to pull your pelvis out of alignment.
Proper Form for Side Plank with Leg Lift
Your elbow must stay directly under your shoulder. When viewed from the front, your upper shoulder, hips, and upper leg should be in a straight line.
Don't rest your head on your shoulder or let your hips drop. Don't tilt your upper shoulder, hips, pelvis, or legs forward or backward. If the full position is too difficult, keep both knees bent and work up to the extended top leg.
3. Hamstrings (Nordic Curl)
Kneel on the ground with your upper body straight. Your knees and lower legs should be hip-width apart. Cross your arms in front of your body. Have a partner pin your ankles firmly to the ground with both hands.
Slowly lean forward, keeping your upper body and hips straight. Your thighs, hips, and upper body should stay in a straight line. Try to maintain a straight body alignment for as long as possible. When this body position can no longer be maintained by the hamstrings, use both hands to control your fall. Perform five times.
Nordic Curl for Hamstring Injury Prevention
This is the single most effective exercise for preventing hamstring strains. It trains eccentric hamstring strength, the exact type of contraction that fails during high-speed running. When you sprint, your hamstring must lengthen while contracting to decelerate your lower leg as your quad pulls it forward.
If your hamstring can't generate sufficient force during the lengthening phase, it overstretches and tears. The Nordic curl replicates that demand. Your hamstrings work maximally to control your descent against gravity. That eccentric loading builds the strength reserve you need when you accelerate past a defender.
Proper Form for Nordic Curls
Your partner must keep your ankles firmly on the ground. Your upper body, hips, and thigh must remain in a straight line. Don't bend at your hips or tilt your head backward. Perform the exercise slowly at first.
Once you feel more comfortable, speed it up slightly, but never sacrifice control. If you can't lower yourself even halfway, use your hands to assist the descent and focus on slowing the fall as much as possible. Strength will build over time.
4. Cross-Country Skiing (Single-Leg Squat With Arm Swing)
Stand on your right leg and let your other leg hang relaxed. Bend your knee and hips slightly so your upper body leans forward. When viewed from the front, the hip, knee, and foot of your supporting leg should be in a straight line.
Flex and extend the knee of your supporting leg and swing your arms in opposite directions in the same rhythm. Flex your knee as much as possible, but keep weight balanced on the entire foot. In extension, never lock your knee. Keep pelvis and upper body stable and facing forward. Perform 15 times on your right leg, then 15 times on your left leg.
Single-Leg Balance for Knee Stability
This exercise improves single-leg balance and strengthens the muscles that stabilize your knee in the frontal plane (preventing inward collapse). Most soccer movements happen on one leg, such as planting to kick, cutting to change direction, and landing from a jump.
If your glutes and hip abductors can't stabilize your pelvis and knee during those moments, your knee drifts inward, loading your ACL and medial meniscus in positions they weren't designed to handle. The arm swing adds a dynamic element that challenges your balance and mimics the coordination demands of running.
Proper Form for Single-Leg Balance Exercises
Keep your upper body and pelvis stable and facing forward. Keep your pelvis horizontal and don't let it tilt to the side. Balance your weight across the whole foot.
Don't let the knee of your supporting leg buckle inward. Never let your knees meet. If you struggle with balance, start with smaller knee bends and progress to deeper flexion as your control improves.
5. Chest-Passing in Single-Leg Stance
Face a partner at a distance of three meters away, each of you standing on your right leg. Knees and hips should be slightly bent. Keep your weight on the ball of your foot or lift your heel from the ground. When viewed from the front, the hip, knee, and foot of your supporting leg should be in a straight line.
Throw a ball back and forth, like when standing on your right leg, throw with your left arm, and vice versa. Catch the ball with both hands, and throw it back with one hand. The quicker the exchange of the ball, the more effective the exercise. Perform 10 times on your right leg, then 10 times on your left leg.
Ball Toss for Proprioception and Coordination
This adds proprioceptive challenge and coordination to single-leg balance. The ball toss creates an unpredictable perturbation that forces your ankle, knee, and hip stabilizers to react in real time.
That's exactly what happens during a game when an opponent moves unexpectedly, or the ball bounces at an odd angle. Your nervous system learns to make rapid adjustments while maintaining alignment. The quicker the exchange, the less time you have to think, which forces your body to rely on automatic neuromuscular patterns rather than conscious control.
Proper Form for Ball Toss Balance Exercise
Keep your upper body and pelvis stable and facing forward. Keep your pelvis horizontal and don't let it tilt to the side. Keep your hips and the knee of your supporting leg slightly bent at all times.
Don't let your knee buckle inward. Keep your weight on the ball of your foot or lift your heel fully off the ground. If balance is difficult, slow down the exchange until you can maintain proper alignment, then gradually increase speed.
6. Forward-Bend in Single-Leg Stance
For Exercise 5, face your partner at a distance of 3 meters, each of you standing on your right leg. Throw the ball back and forth, but before throwing back, touch the ball to the ground without putting weight on it. Perform 10 times on your right leg, then 10 times on your left leg.
Single-Leg Hip Hinge for Mobility and Power
This progression increases the demand for range of motion and challenges hip hinge mechanics while maintaining single-leg balance. Touching the ball to the ground requires you to flex your hip and knee deeply while keeping your pelvis stable and your spine neutral.
That's the same movement pattern you use when reaching for a low ball or recovering from a tackle. Poor hip hinge mechanics (rounding your lower back instead of hinging at your hips) create excessive spinal load and reduce your ability to generate power from your hips and glutes.
Proper Form for Single-Leg Hip Hinge Exercise
Keep your pelvis horizontal and don't let it tilt to the side. Keep your hips and the knee of your supporting leg slightly bent throughout. Don't let your knee buckle inward. Keep weight only on the ball of your foot, or lift your heel fully off the ground.
When touching the ground with the ball, don't place your weight on the ball. If you can't reach the ground without losing balance or rounding your back, reduce the depth and gradually work toward full range.
7. Figure-of-Eight in Single-Leg Stance
For Exercise 5, face your partner at a distance of 3 meters, each of you standing on your right leg. Throw the ball back and forth, but before throwing back, swing the ball in a figure-of-eight through and around your legs.
First, wrap your supporting leg with your upper body leaning forward, then wrap your other leg while standing as upright as possible. Perform 10 times on your right leg, then 10 times on your left leg.
Figure-of-Eight Single-Leg Balance Challenge
This is the most complex single-leg balance challenge in the series. The figure-of-eight movement requires coordinated hip flexion, rotation, and extension while maintaining stability on one leg.
It trains your ability to move through multiple planes of motion without losing control, which directly translates to the unpredictable, multi-directional demands of soccer. Your core, hip stabilizers, and ankle proprioceptors must work together to keep you upright while your upper body and arms move dynamically.
Proper Form for Figure-of-Eight Exercise
Keep your pelvis horizontal and don't let it tilt to the side. Keep your hips and the knee of your supporting leg slightly bent throughout. Don't let your knee buckle inward. Keep weight only on the ball of your foot, or lift your heel fully off the ground.
Your upper body should move substantially up and down during this exercise. If the full figure-of-eight is too challenging, simplify by passing the ball around just your supporting leg until you build sufficient control.
8. Jumps Over a Line (Lateral and Anterior-Posterior Hops)
Stand with feet hip-width apart, about 20 centimeters to the side of a line. Bend your knees and hips slightly so your upper body leans forward a little. When viewed from the front, the hip, knee, and foot of each leg should be in a straight line.
Arms should be slightly bent and close to the body. Jump with both feet, sideways over the line and back, as quickly as possible. Land softly on the balls of both feet with slightly bent knees. Jump 10 times side-to-side, then 10 times forward and backward over the line.
Landing Mechanics for ACL Injury Prevention
According to JAG Physical Therapy, 60% of soccer injuries occur in the lower extremities, with poor landing mechanics being a primary contributor. This exercise trains your nervous system to absorb impact through proper joint angles. Most ACL injuries happen during landing when the knee is nearly straight (less than 30 degrees of flexion).
Landing with bent knees and hips distributes force across multiple joints and muscles instead of concentrating it on passive ligaments. The quick, repetitive nature of the drill builds reactive strength, the ability to transition rapidly from eccentric (landing) to concentric (takeoff) muscle action.
Proper Form for Landing and Takeoff Drills
Keep your hips and knees slightly bent throughout. Never let your knees meet, and don't let them buckle inward. Push off both feet and land on the balls of both feet. Land softly with your knees bent to cushion impact.
Never land with extended knees or on your heels. A soft landing and quick takeoff are more important than the height of the jump. If you can't maintain proper alignment, slow down the tempo until control improves.
9. Zigzag Shuffle (Lateral Agility Drill)
Stand at the start of a zigzag course (six marks set 10 by 20 meters), with legs shoulder-width apart. Bend your knees and hips so that your upper body leans substantially forward. One shoulder should point in the direction of movement.
Shuffle sideways to the first mark, turn so that your other shoulder points to the next mark, and complete the zigzag course as fast as possible. Always take off and land on the balls of your feet. Complete the course twice.
Lateral Movement and Deceleration for Knee Safety
This trains lateral movement mechanics and deceleration control at speed. Soccer involves frequent changes of direction, and most knee injuries occur during cutting and pivoting.
The shuffle pattern teaches you to keep your center of gravity low, maintain hip and knee flexion, and control deceleration forces as you change direction. The forward lean and bent-knee position keep your weight over your base of support, reducing the likelihood of your knee collapsing inward when you plant.
Proper Form for Shuffle and Cutting Drills
Always keep your upper body leaned forward with your back straight. Keep your hips and knees substantially bent. Push off and land on the balls of both feet. Land softly with your knees bent to cushion impact.
Keep knees soft throughout and don't let them buckle inward. Never land with extended knees or on your heels. If you lose form as you fatigue, slow down. Quality of movement matters more than speed.
10. Bounding (Single-Leg Power Development)
Stand on your takeoff leg with your upper body upright. The arm on the takeoff leg side should be in front of your body. When viewed from the front, the hip, knee, and foot of your takeoff leg should be in a straight line.
Spring as high and as far as possible off your takeoff leg. Bring the knee of your trailing leg up as high as possible and bend the opposite arm in front of your body when bounding. Land softly on the ball of your foot with a slightly bent knee. Cover a distance of 30 meters twice.
Bounding for Explosive Power and Landing Mechanics
Bounding develops explosive single-leg power and reinforces proper takeoff and landing mechanics. It trains your hamstrings, glutes, and calves to generate force rapidly while your stabilizers maintain alignment.
The exaggerated knee drive and arm swing teach coordinated movement patterns that transfer directly to sprinting and jumping. The single-leg landing phase is critical. It forces your body to absorb impact on one leg, which is exactly what happens when you land from a header or plant to cut.
Proper Form for Bounding Exercises
Bring your trailing leg and the opposite arm up in front of your body when bounding. Land on the ball of your foot and with your knee bent to cushion impact. Don't let your knee buckle inward during takeoff or landing.
Never land with extended knees or on your heels. If you struggle with balance or alignment during landing, reduce the distance and height of each bound until you can maintain control.
11. Running Progressions (Straight Ahead, Hip Out, Hip In, Circle Partner, Shoulder Contact, Quick Forward and Backward)
Set up a course of six to 10 pairs of parallel cones, approximately five to six meters apart. Two players can start simultaneously from the same pair of cones. Jog together all the way to the last pair of cones. On the way back, you can progressively increase your speed as you warm up. Do two sets.
Hip Rotation Drill for Mobility
Walk or jog comfortably, stopping at each pair of cones to lift your knee and rotate your hip outward. Alternate between left and right legs at successive cones. Do two sets. Then repeat, rotating your hip inward at each pair of cones. Do two sets.
Side Shuffle Drill for Lateral Control
Run forward in pairs to the first set of cones. Shuffle sideways by 90 degrees to meet in the middle. Shuffle around the entire circle, then return to the cones. Repeat for each pair of cones. Stay on your toes and keep your center of gravity low by bending your hips and knees. Do two sets.
Shoulder Contact Jump Drill
Run forward in pairs to the first pair of cones. Shuffle sideways by 90 degrees to meet in the middle, then jump sideways toward each other to make shoulder-to-shoulder contact. Land on both feet with your hips and knees bent.
Don't let your knees buckle inward. Make a full jump and synchronize your timing with your teammate as you take off and land. Do two sets.
Forward-Backward Cone Drill for Deceleration
As a pair, run quickly to the second set of cones, then run backward quickly to the first pair of cones, keeping your hips and knees slightly bent. Keep repeating the drill, running two cones forward and one cone backward. Take small, quick steps. Do two sets.
Dynamic Warm-Up for Injury Prevention
These progressions warm up your muscles, activate your nervous system, and prepare your joints for the specific movement patterns required in soccer. The hip rotations improve hip mobility and activate your glutes. The shuffle and circle drill trains lateral movement control.
The shoulder contact drill adds a plyometric landing challenge with light contact, preparing you for physical play. The forward-backward runs improve deceleration and backpedaling mechanics. Together, they create a comprehensive dynamic warm-up that reduces injury risk more effectively than static stretching.
12. Single-Leg Stance (Hold the Ball)
Stand on one leg. Balance on one leg while holding the ball with both hands. Keep your weight on the ball of your foot. Try not to let your knee buckle inward. Hold for 30 seconds. Change legs and repeat. The exercise can be made more difficult by passing the ball around your waist and/or under your other knee. Do two sets.
Ankle Proprioception and Single-Leg Balance
This improves ankle proprioception and single-leg balance, both of which decline after ankle sprains and remain impaired even after pain resolves. Proprioception is your body's ability to sense joint position and movement without looking.
When you step on uneven ground or get nudged during a tackle, your ankle must react instantly to maintain stability. If proprioception is poor, your ankle doesn't correct quickly enough, and you roll it. Ball manipulation introduces cognitive and coordination challenges, requiring your stabilizers to work while your attention is divided.
Proper Form for Proprioception Drill
Keep your weight on the ball of your foot. Don't let your knee buckle inward. If 30 seconds is too long, start with 15 seconds and build up. If it's too easy, close your eyes or stand on an unstable surface, such as a foam pad.
13. Squats With Toe Raise
Stand with your feet hip-width apart. Place your hands on your hips if you like. Imagine that you are about to sit on a chair. Perform squats by bending your hips and knees 90 degrees.
Don't let your knees buckle inward. Descend slowly, then straighten up more quickly. When your legs are completely straight, stand on your toes, then slowly lower down again. Repeat the exercise for 30 seconds. Do two sets.
Squats for Lower-Body Strength and Knee Safety
This strengthens your quads, glutes, and calves while reinforcing proper squat mechanics. The controlled descent trains eccentric quad and glute strength. The toe raise at the top strengthens your calves, which are critical for ankle stability and push-off power during sprinting and jumping.
The key is alignment. Your knees must track over your toes, not collapse inward. The medial knee collapse (valgus) is the exact position that loads your ACL dangerously.
Proper Form for Squat Mechanics
Don't let your knees buckle inward. Descend slowly, then straighten up more quickly. If you can't maintain alignment, reduce the depth of the squat and focus on control. As strength improves, work toward 90 degrees of knee flexion.
14. Jumping (Vertical Jumps)
Stand with your feet hip-width apart. Place your hands on your hips if you like. Imagine that you are about to sit on a chair. Slowly bend your legs until your knees are flexed to approximately 90 degrees, then hold for two seconds.
Don't let your knees buckle inward. From the squat position, jump up as high as you can. Land softly on the balls of your feet with your hips and knees slightly bent. Repeat the exercise for 30 seconds. Do two sets.
Proper Form for Squat Jump Landing
This trains explosive power and landing mechanics. The two-second hold in the squat position eliminates the stretch-shortening cycle (the elastic recoil you get from a quick dip), forcing your muscles to generate force from a dead stop.
That builds pure concentric strength. The landing phase trains eccentric control and reinforces the bent-knee, soft-landing pattern that protects your ACL and meniscus.
Proper Form for Squat Jump Landing
Don't let your knees buckle inward during the squat or landing. Land softly on the balls of your feet with your hips and knees slightly bent. If you can't land softly or maintain alignment, reduce the jump height and focus on control. Proper mechanics matter more than how high you jump.
15. Plant and Cut (Directional Change Drill)
Jog four to five steps, then plant on the outside leg and cut to change direction. Accelerate and sprint for five to seven steps at high speed (80 to 90% of maximum pace), then decelerate and execute a new plant and cut. Don't let your knee buckle inward. Repeat the exercise until you reach the other side, then jog back. Do two sets.
Cutting Drill for ACL Injury Prevention
This is the most sport-specific drill in the series. It replicates the exact movement pattern that causes most non-contact ACL injuries, like planting on one leg to cut while moving at speed. The drill trains your body to decelerate, stabilize, and redirect force without allowing your knee to collapse inward.
The high-speed component is critical. Injuries don't happen during slow, controlled movements. They happen when you're moving fast, fatigued, and under pressure. This drill prepares your nervous system for those conditions.
Proper Form for High-Speed Planting
Don't let your knee buckle inward during the plant. If you can't maintain alignment at 80 to 90% speed, reduce the pace until control improves, then gradually increase intensity. Quality of movement always comes before speed.
Related Reading
- Do Muscle Tears Heal On Their Own
- Forearm Strain
- How Can Strengthening Muscles Prevent Injury
- Quad Strain Recovery Time
- Urgent Care For Pulled Muscle
- How To Heal A Calf Strain Quickly
- How To Prevent Hamstring Injuries
- How Long Does a Sprained Knee Take to Heal
- How Does Stretching Prevent Injury
- How To Strengthen Shins For Running
- Athletic Injury Recovery
How to Build Injury Prevention Into Your Soccer Routine
.jpeg)
Prevention work fails most often not because players lack discipline, but because it competes with everything else in their schedule and loses. You already have training sessions, games, school or work, recovery, and life outside soccer. Adding 45 minutes of injury prevention exercises feels like one more obligation you can't sustain.
Embedding Injury Prevention Into Your Routine
The solution isn't finding more time. It's embedding the work into the structure you already have:
- Warm-ups before training
- Short mobility blocks on off days
- Targeted recovery sessions after matches
Consistency beats volume. Three focused 15-minute sessions per week will reduce your injury risk more than sporadic hour-long workouts that happen twice a month and then disappear.
Motivation Challenges in Injury Prevention
The real friction isn't time. It's boredom and invisibility. Prevention exercises don't feel like progress the way a faster sprint time or a cleaner first touch does. You can't measure improvement in injuries that didn't happen. That gap between effort and visible reward kills motivation.
Tracking Progress to Maintain Consistency
According to Physical Therapy & Sports Medicine Centers, 70% of soccer injuries occur in the lower extremities, yet most players abandon prevention routines within six weeks because the work feels repetitive and the benefits feel abstract.
You need a system that tracks progress in ways you can see, such as increased range of motion, improved balance times, and reduced muscle tightness. Without feedback, consistency dies.
Warm-Ups are Prevention, Not Just Preparation
Most players treat warm-ups as a formality before the real work begins. They jog a few laps, perform static stretches, and begin drills. That approach prepares your cardiovascular system but does nothing to activate the stabilizers and movement patterns that protect joints under load.
A proper warm-up primes your nervous system, increases tissue temperature, and rehearses the exact movement mechanics you'll need during training. It's the most efficient place to embed injury-prevention work because you're already there and moving, and the exercises directly improve your performance in the following session.
Dynamic Warm-Ups for Injury Prevention
Dynamic warm-ups that include Nordic curls, single-leg balance drills, and lateral hops take 12 to 15 minutes. That's longer than most players spend jogging, but shorter than the six weeks you'll miss if you tear a hamstring.
The exercises activate your glutes, hamstrings, and core before you sprint or cut, ensuring those muscles are ready to stabilize your joints under load. Players who skip this activation and go straight into high-intensity drills ask cold, unprepared tissues to handle loads they're not ready for. That's when strains happen.
Warm-Ups as a Daily Movement Screening Tool
The warm-up also functions as a daily movement screen. If your hamstrings feel unusually tight during a Nordic curl, or your ankle wobbles more than usual during single-leg balance work, you've identified a problem before it becomes an injury.
You can adjust training intensity, add extra mobility work that day, or focus on the area during recovery. That real-time feedback loop is what separates players who stay healthy from those who push through warning signs until something breaks.
Off-Day Mobility Work Addresses What Training Doesn't
Training days build fitness, skill, and tactical understanding. They don't fix the mobility restrictions and muscle imbalances that accumulate from repetitive movement patterns.
Soccer players develop predictable tightness in the hip flexors from constant sprinting, calves from repeated push-offs, adductors from wide stances, and thoracic spine stiffness from forward-leaning postures. Those restrictions don't resolve on their own. They compound until they alter your movement mechanics and create compensation patterns that overload other tissues.
Targeted Mobility Work on Rest Days
Off days are when you address those imbalances. Not with passive rest, but with targeted mobility work that restores range of motion and resets muscle tension. Hip flexor stretches that counteract the shortening from sprinting. Calf and ankle mobility drills that restore dorsiflexion lost from repetitive plantarflexion.
Adductor strengthening that balances force production across the hip. Thoracic rotations that maintain spinal mobility. These sessions don't need to be long. Fifteen to twenty minutes, three times per week, is enough to prevent tightness from becoming a chronic restriction.
Structured Approach to Address Hidden Imbalances
The challenge is structure. Most players know they should stretch more, but without a clear plan, they default to whatever feels tight in the moment. That reactive approach misses the imbalances they can't feel yet.
The hip that's losing internal rotation. The ankle that's compensating for limited dorsiflexion. The core that's letting the pelvis tilt during single-leg movements. You need a progression that addresses those areas systematically, not randomly.
Post-Match Recovery Resets the Body for The Next Cycle
Games create acute stress that training doesn't replicate. Higher intensity, longer duration, more contact, and less control over movement patterns. Your body accumulates micro-damage, including muscle fibers that tear slightly, joints that compress under impact, and connective tissue that stretches beyond its normal range.
That damage is normal. It's part of how the body adapts. But if you don't actively facilitate recovery, the damage accumulates faster than repair happens, and you start the next training week in a deficit.
Post-Match Recovery for Muscle and Joint Health
Post-match recovery should focus on reducing muscle tension, restoring joint mobility, and flushing metabolic waste from tissues. Light aerobic activity increases blood flow without adding training stress. Foam rolling and stretching reduce muscle tightness before it becomes chronic.
Ankle and hip mobility work restores the range of motion lost during the match. Core activation drills reset pelvic alignment and prepare stabilizers for the next training session. This work doesn't need to happen immediately after the final whistle. Within 24 hours is sufficient.
The Importance of Consistent Recovery Work
The mistake is treating recovery as optional. Players who feel fine the day after a match assume they don't need it. But soreness isn't the only indicator of accumulated stress.
Reduced range of motion, altered movement patterns, and decreased proprioception happen before pain appears. By the time you feel tight or sore, the compensation has already started. Recovery work prevents that progression. It keeps small stress from becoming chronic dysfunction.
Progression Matters More Than Perfection
You don't need to execute every exercise perfectly from day one. Start from your current position and progress gradually as strength, mobility, and control improve. If you can't lower yourself halfway through a Nordic curl, use your hands to assist the descent and focus on controlling the fall.
If single-leg balance feels unstable, reduce the duration or remove the ball manipulation until your ankle stabilizers catch up. If plyometric landings cause your knee to collapse inward, slow the tempo and reduce the jump height until alignment improves.
Progress Through Consistent Practice
Progression happens through consistent exposure, not perfect execution. Your nervous system adapts to the movement patterns you practice most often. If you practice landing with proper knee alignment three times per week, even if the jumps are small and controlled, your body learns that pattern.
Over weeks and months, it becomes automatic. You can increase intensity, add complexity, and eventually perform the movement at game speed with the same control you built at slower speeds.
Adapting Injury Prevention for Long-Term Consistency
Players who sustain injury-prevention work over the long term are the ones who adapt it to their current capacity and schedule. They don't wait for the perfect 45-minute window. They do 10 minutes before training, five minutes before bed, and 15 minutes on Sunday morning.
They track what they actually complete, not what they intended to do. They adjust exercises when something feels off instead of pushing through discomfort. That flexibility is what separates sustainable routines from ambitious plans that collapse under the first scheduling conflict.
Stay on the Field Longer With Smarter Mobility Training
Soccer injuries don't usually happen because you're out of shape. They occur because tight joints, limited range of motion, and small imbalances accumulate over time. Preventing them takes consistent mobility work, not just more conditioning. Pliability helps athletes build consistency through guided, performance-focused mobility routines that improve flexibility, reduce pain, and support recovery.
With daily-updated programs and a body-scanning feature that highlights your personal mobility limitations, Pliability makes injury prevention part of your routine, not an afterthought. If you want to move better, recover faster, and spend more time on the field, try Pliability free for 7 days on iPhone, iPad, Android, or web.
Related Reading
- How To Fix Lower Back Pain From Running
- How To Prevent Stress Fractures From Running
- Care And Prevention Of Athletic Injuries
- Compression Therapy For Athletes
- Soccer Injury Prevention Exercises
- Best Foam Roller For Runners
- Ankle Injury Prevention Exercises
.jpg)


